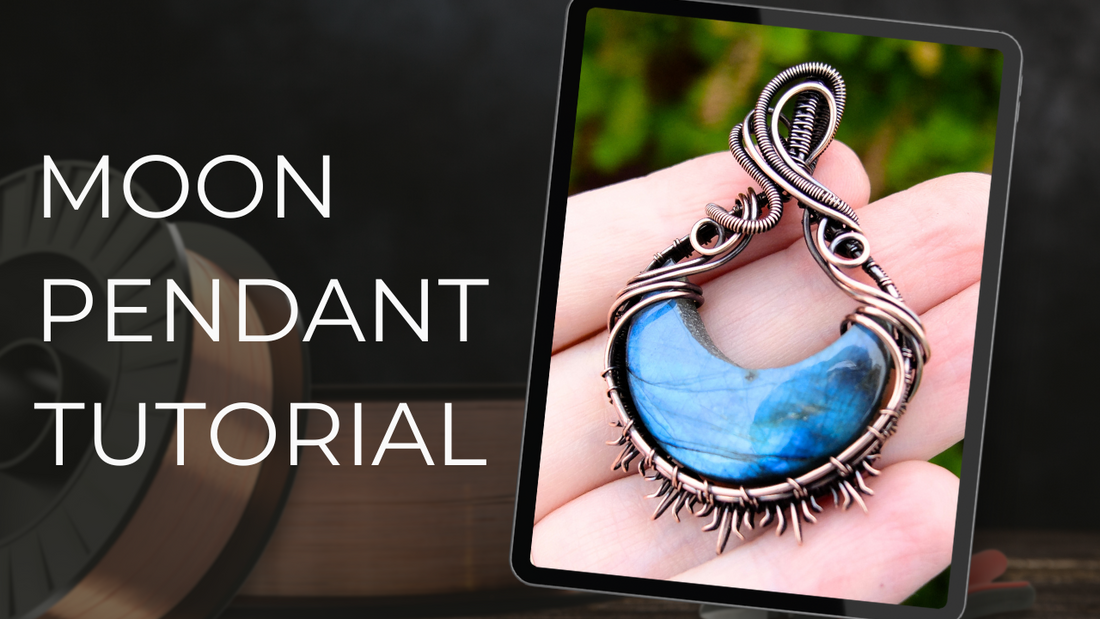
Wire Wrapped Crescent Moon Pendant Tutorial
By Elizabeth SchultzIf you’ve ever wanted to make a piece of jewelry that feels magical and one-of-a-kind, this wire wrapped crescent moon pendant tutorial is the perfect project. Using a mix of beginner-friendly and intermediate weaving techniques, I’ll show you how to transform any size of crescent moon cabochon into a beautiful pendant you can wear or gift.
This project is perfect if you’re learning wire weaving but want something a little more detailed than a basic wrap. You’ll learn how to combine multiple weaves and how to secure your stone.
What You’ll Learn in This Tutorial
In this step-by-step guide, you’ll discover:
-
How to weave with the Ladder Weave, Modified Soumak, and versions of the Flame and Figure-8 weaves.
-
How to create decorative rays with scrap wire.
-
How to adapt this project for any size crescent moon cabochon.
💎 And a quick thank-you to Casdans for their gorgeous, high-quality stones. If you’re tired of rolling the dice with overseas sellers, Casdans is my go-to source for consistent, beautiful cabochons that always make my wire wrapped jewelry projects shine.
Tools & Materials You’ll Need
-
Crescent moon cabochon (any size works)
-
20 gauge round wire (dead-soft) – frame
-
28 gauge round wire (dead-soft) – weaving
-
24 or 26 gauge round wire (dead-soft) – securing rays
-
Chain nose pliers
-
Round nose pliers
-
Flush cutters
-
Ruler & Sharpie
-
Tape
-
Scrap wires (for rays)
Step-by-Step Wire Weaving Instructions
1. Measure the Stone
Wrap tape around the cabochon with a slight gap at the top where your bail will sit. Mark the center, the crescent tips, and where the tape meets at the top.
2. Create the Rays
Use scrap wires and 24 or 26 gauge wire to form rays. Anchor them onto one of your base wires near the bottom of the cabochon.
3. Start with the Ladder Weave
Take three base wires and begin weaving at your first Sharpie mark using the Ladder Weave (sometimes also called the rail weave). Stop at your second mark.
4. Add More Wires and Weave
Introduce your outer wire and continue weaving with a mix of Flame Weave and Figure-8 Weave to strengthen and decorate the frame.
5. Wrap Around the Stone
Switch back to the Ladder Weave to finish the section, then wrap your woven wires around the cabochon to form the setting. Bind the wires at the top.
6. Form the Bail
Weave the front two wires together to form the bail, keeping two wires on each side for structure. Guide the wires through the top gap but wait to finish the bail until the stone is secure.
7. Secure the Cabochon
-
Bend a couple of prongs upward at the back, bottom of the setting.
-
Place the cabochon inside the frame.
-
Wrap the bare front wire over the tips and upward around the Ladder Weave.
-
Follow with the back bare wire for reinforcement.
8. Finish the Bail and Add Detail
-
Bring the bail wires over your previous wraps.
-
Coil the outer wires on both sides.
-
Bend the bare wires downward across the gap and follow with the coiled wire. Trim and tuck ends neatly.
-
Curve the remaining wire slightly before securing it to the opposite side of the Ladder Weave.
9. Add Sparkle and Adjust Rays
Shape the rays until you’re happy with the look. Optional: thread in beads for extra shine.
Your Finished Crescent Moon Pendant
And that’s it! You’ve just created a beautiful DIY wire wrapped crescent moon pendant that you can customize with different stones, bead accents, or even alternate weaving patterns.
If you enjoyed this project, you might also like my other tutorials inside the Artisan Tutorial Vault, a growing library of step-by-step PDF guides designed to help you grow your wire weaving skills with confidence.
👉 Click here to learn more about the Artisan Tutorial Vault
Until next time,
Happy weaving!
– Ellie
Please note that this article contains affiliate links which earn me a small commission when you make a purchase. This helps me to continue to create free content for you, so thank you!
